Laying Sod vs. Planting Seeds
It’s the question on all of our minds -- sod or seed? Okay, well maybe it’s not consuming your everyday thoughts but if you currently have a yard of dirt, you may be pondering about whether laying sod or planting seeds is the better option when it comes to getting that green lawn of your dreams. There’s not just one correct answer. We are going to break both options down for you so that you can find the perfect solution to your lawn needs.
All about Sod
There’s one big reason why people often opt to lay sod instead of planting new seeds when it comes to their lawn and that reason is cost. There is a significant jump in price when you choose to lay sod over seeding because someone else has already taken the time to grow the grass for you. This also may be the option for you if you’re looking to save some time and effort. Here are our tips on everything you need to know about laying sod.
Start with Soil
Tools needed:
- Rototiller
- Soil test kit (if needed, ask your local lawn supply store)
- Spade
- Topsoil
- Starter fertilizer
- Rake or lawn roller (for leveling soil)
Soil is your very first priority. Laying sod down on unhealthy soil is about as productive as slapping a band-aid on a broken leg. Healthy soil is an absolute necessity before laying down grass of any kind. You’ll need to keep the following in mind:
- Soil should have pH of 6.0 to 6.5 (you can use a soil test kit if unsure)
- Depth of approximately 6 inches is the very minimum amount of soil needed
- You can mix in compost with a spade to revitalize it
First, loosen the top 6 inches with a rototiller in order to help prevent soil compaction. Then you’ll need to add a topsoil of about 4-6 inches. Now is also the time to mix in compost if you have it. Those added nutrients will do wonders for your lawn. Next you’ll apply a starter fertilizer (refer to fertilizer for specific instructions) to the top of the soil. From here all you need to do is level everything out with a rake and you’re good to go!
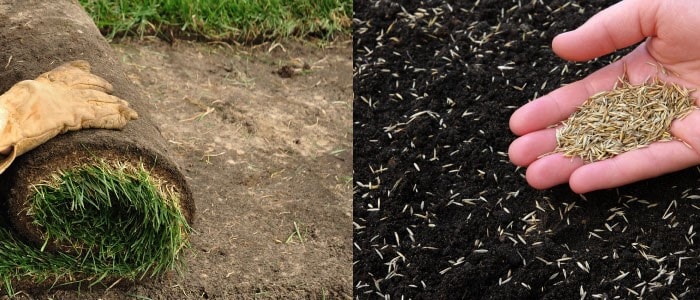
Lay Some Sod
Tools needed:
- Sod
- Gloves
You’ll need to lay sod immediately upon delivery in order to prevent the sod from drying out. So where to begin? Just find the longest straight edge and start there. Unroll the first roll of sod along this line and smooth out as you go by patting down the sod so that there are no air pockets. Make sure to avoid stepping on the sod as you go. You’ll take smaller pieces of sod and stagger them as you go (see picture below). Make sure edges are pushed snugly against each other and don’t overlap.

Water that Sod
Once all the sod is laid out it’s time to water, water, water. It’s recommended to water within a half hour of installation and then daily from there until the the sod is firmly rooted. This typically will take about two weeks. In the beginning you should give your new lawn about 1 inch of water but once rooted, watering can become less frequent and will all depend on the environment where you live.
One quick pro-tip: Avoid temptation to roll around on your new lawn for the first few weeks! The roots need time to combine with the soil without interruption.
To Seed or Not to Seed
By now you should know the ins and outs of sodding. Maybe that’s not the option for you. Fortunately there is still the option of growing your own grass. This is a great choice if you are looking to save some money and are willing to give the seeds the extra attention and care that they will need. You only have to wait about 2 weeks to start seeing growth -- practically no time at all, right?
Finding the Right Seed
Great grass can only come from great seeds so it’s important to find top notch seeds. Pay attention to things like amount by weight, percent of weed seed, and germination rate. It’s also key to make sure that you’re getting the right type of grass for the season and area you live in. Warm-Season grasses are seeded March through September and thrive in temperatures above 80 degrees. Cool-Season grasses are seeded August through October and thrive in temperatures around 60 degrees.
Prepare the Soil
Tools needed:
- Rototiller
- Rake or lawn roller (for leveling soil)
- Topsoil
- Starter fertilizer
- Compost (if needed)
First you’ll use a rototiller to till to about 3 inches. The soil will need to meet the same standards as if you were laying sod. Then use a rake or lawn roller to go over the area to make sure the soil is smooth and free of clumps and rocks. From here you’ll follow the same steps listed above for sodding -- add topsoil, compost (if necessary), and a starter fertilizer. Work into the soil and then level the area once more.
Spread the Seed
Tools needed:
- Grass seed (consult your local store)
- Seed spreader
- Rake or lawn roller
You can spread by hand for smaller areas but for larger areas and a more even coverage we recommend using a seed spreader. Follow the directions on the package as far as how much seed to use. Once you have evenly spread the seed on the soil, rake and roll again to ensure you are getting even coverage.
Cover Up
Tools needed:
- Mulch (if soil isn't enough)
- Rake
It’s not time to walk away quite yet. Those seeds are exposed to wind and you don’t want them flying away. Cover them with a small amount of dirt or mulch -- about a quarter inch. Gently use a rake to drag soil over seeds or use yours hands to spread mulch. A mulch consisting of straw works great.
Watering Time
Just as with sod, it’s important to not let your grass seeds dry out. Make sure to water your lawn 2-3 times until the seeds have germinated. From there a couple times a week should be all you need. In just a couple of short weeks your beautiful new grass will start to sprout!
As always, TaskEasy is here for you and all of your home and lawn care needs. We have a large network of service experts ready to come take care of your lawn or answer any questions you may have.
